Getting Started with AMQP in your Quarkus application

AMQP 1.0 is a standard for passing messages between applications or organizations. It connects systems, feeds business processes with the information they need, and reliably handles communication between systems. AMQP is a robust and mature protocol widely used in event-driven applications.
This post is the equivalent of the Kafka getting started post, but focuses on the usage of AMQP. You will learn how to get started with AMQP in your Quarkus application in less than ten steps. We will use SmallRye Reactive Messaging - a declarative approach to building event-driven microservices.
| The complete code is available from GitHub. |
Step 1 - Generate your project
Let’s start with the very beginning, getting a new project structure with the right dependencies. Go to https://code.quarkus.io, enter your group id and artifact id. Then in the extension list, select:
-
SmallRye Reactive Messaging - AMQP Connector
-
RESTEasy Jackson
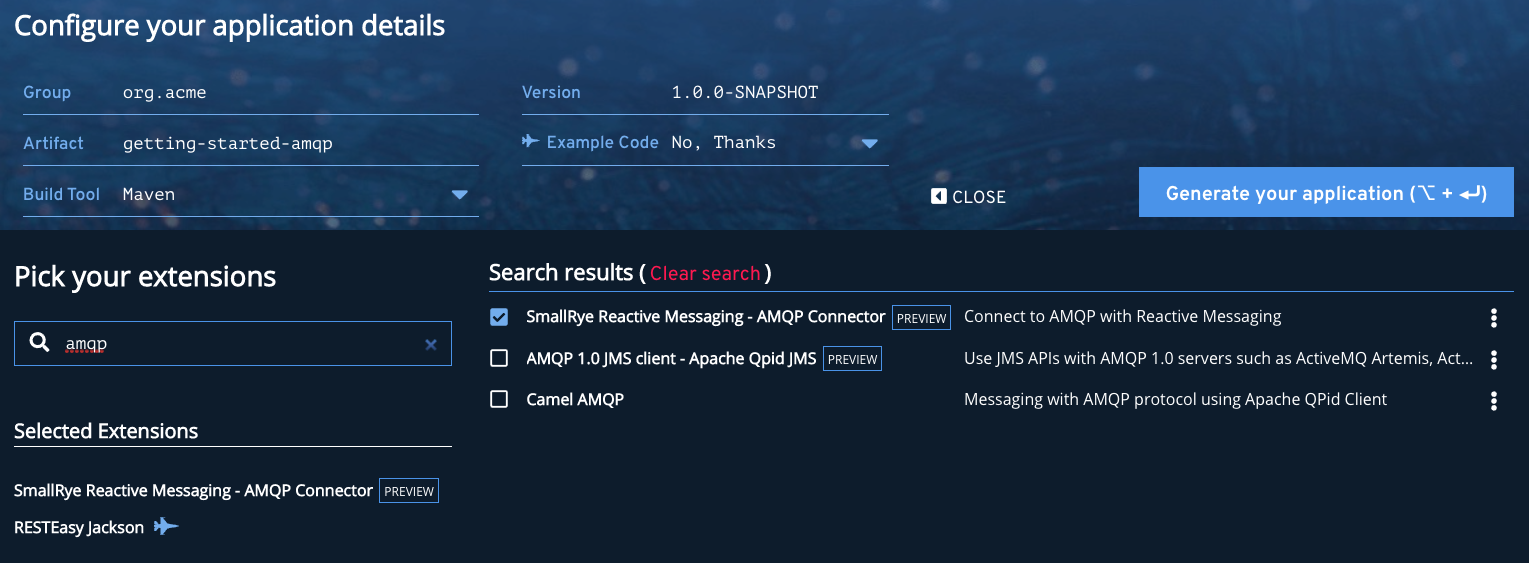
| You can disable the "Example Code" to avoid the generated project containing examples. |
Then, click on Generate your application, download the project as a zip file, unzip it, and load it in your favorite IDE.
If you opened the generated pom.xml, you would see that the quarkus-smallrye-reactive-messaging-amqp and quarkus-resteasy-jackson
dependencies are declared, so we’re ready to write some code.
Step 2 - What are we going to exchange?
We need something to exchange.
Without much originality, let’s say we will send and receive Movie objects.
In your project, create the org.acme.Movie class with the following content:
package org.acme;

public class Movie {

    public String title;
    public int year;

}
With AMQP, we exchange messages, which can have multiple data sections (or multiple AMQP sequences, or a single AMQP value section).
In our application, as we are exchanging Movie object, it encodes the instances as JSON and transfers it in a single data section.
The content-type header is set to application/json.
AMQP messages are sent to a destination. To keep things simple, let’s name it movies.
Step 3 - Configure the application
As said above, we will use Reactive Messaging.
When you use Reactive Messaging, you send messages to a channel and receive them from another channel.
These channels are mapped to the underlying messaging technology by configuration.
We must indicate that our reception and publication channels will use the movies address in our application.
In src/main/resources/application.properties, add the following content:
# The AMQP broker location and credentials
amqp-host=localhost
amqp-port=5672
amqp-username=quarkus
amqp-password=quarkus

# Configuring the incoming channel (reading from AMQP)
mp.messaging.incoming.movies-in.connector=smallrye-amqp
mp.messaging.incoming.movies-in.address=movies

# Configuring the outgoing channel (writing to AMQP)
mp.messaging.outgoing.movies-out.connector=smallrye-amqp
mp.messaging.outgoing.movies-out.address=movies
After having configured the broker location and credentials (amqp- properties), we configure our two channels: movies-in (receiving the records) and movies-out (publishing the records).
We use the mp.messaging.incoming.movies-in prefix to configure the channel.
The connector attribute indicates who’s responsible for this channel, here the AMQP connector.
We also need to specify the consumed destination using the address attribute.
To configure the outbound movies-out channel, we use the mp.messaging.outgoing.movies-out prefix.
In addition to indicating who’s responsible for that channel, we also need to configure the address.
Step 4 - Publishing movies to AMQP
Now, it’s time to send messages.
Create the org.acme.MovieProducer class with the following content:
package org.acme;

import org.eclipse.microprofile.reactive.messaging.Channel;
import org.eclipse.microprofile.reactive.messaging.Emitter;

import javax.enterprise.context.ApplicationScoped;
import javax.inject.Inject;

@ApplicationScoped
public class MovieProducer {

    @Inject
    @Channel("movies-out")
    Emitter<Movie> emitter;

    public void send(Movie movie) {
        emitter.send(movie);
    }
}
In this class, we inject an Emitter, i.e., an object responsible for sending a message to a channel.
This emitter is attached to the movies-out channel (and will send messages to AMQP).
The connector automatically encoded the content as JSON and set the content-type header.
| You need to make sure your payload can be encoded to JSON. |
So, the rest of our application can use the send method to send a movie to our AMQP destination.
Step 5 - Consuming movies
Let’s now look at the other side and retrieve the movies from AMQP.
package org.acme;

import org.eclipse.microprofile.reactive.messaging.Incoming;
import org.jboss.logging.Logger;

import javax.enterprise.context.ApplicationScoped;

@ApplicationScoped
public class MovieConsumer {

    private final Logger logger = Logger.getLogger(MovieConsumer.class);

    @Incoming("movies-in")
    public void receive(Movie movie) {
        logger.infof("Got a movie: %d - %s", movie.year, movie.title);
    }
}
Here, we use the @Incoming annotation to indicate to Quarkus to call the receive method for every received record.
Remember, the movie is encoded into JSON, so we need to help the connector produce a Movie from the received JSON.
Create the org.acme.JsonToObjectConverter class with the following content:
package org.acme;

import io.smallrye.reactive.messaging.MessageConverter;
import io.smallrye.reactive.messaging.amqp.IncomingAmqpMetadata;
import io.vertx.core.json.JsonObject;
import org.eclipse.microprofile.reactive.messaging.Message;

import javax.enterprise.context.ApplicationScoped;
import java.lang.reflect.Type;

@ApplicationScoped
public class JsonToObjectConverter implements MessageConverter {

    @Override
    public boolean canConvert(Message<?> in, Type target) {
        return in.getMetadata(IncomingAmqpMetadata.class)
                .map(meta -> meta.getContentType().equals("application/json")  && target instanceof Class)
                .orElse(false);

    }

    @Override
    public Message<?> convert(Message<?> in, Type target) {
        return in.withPayload(((JsonObject) in.getPayload()).mapTo((Class<?>) target));
    }
}
This class is a converter.
It maps the content of a Message to another type.
In the canConvert method, we verify that the incoming message is coming from AMQP (so contain the IncomingAmqpMetadata metadata) and that the content-type is set to application/json.
The convert method maps the received JsonObject into the target type (Movie in our case).
With this converter, our consume method will receive the Movie objects.
Step 6 - Sending movies from a REST endpoint
It’s quite common to send messages to AMQP from a REST endpoint.
To do this, create the org.acme.MovieResource class with the following content:
package org.acme;

import javax.inject.Inject;
import javax.ws.rs.Consumes;
import javax.ws.rs.POST;
import javax.ws.rs.Path;
import javax.ws.rs.Produces;
import javax.ws.rs.core.MediaType;
import javax.ws.rs.core.Response;

@Path("/")
@Consumes(MediaType.APPLICATION_JSON)
@Produces(MediaType.APPLICATION_JSON)
public class MovieResource {

    @Inject
    MovieProducer producer;

    @POST
    public Response send(Movie movie) {
        producer.send(movie);
        // Return an 202 - Accepted response.
        return Response.accepted().build();
    }
}
This class uses the MovieProducer we implemented above to send the movies.
You could also use an Emitter directly.
Step 7 - Let’s get this running!
Well, first, we need an AMQP broker, for example Apache ActiveMQ Artemis.
You can follow the Getting Started with Artemis documentation, or use the following docker-compose.yaml file:
version: '2'

services:

  artemis:
    image: vromero/activemq-artemis:2-alpine-latest
    ports:
      - "5672:5672"
      - "8161:8161"
      - "61616:61616"
    environment:
      ARTEMIS_USERNAME: quarkus
      ARTEMIS_PASSWORD: quarkus
Copy the docker-compose.yaml file in your project, and from a terminal, start your broker with: `docker-compose up -d'
Then, run the application using:
./mvnw quarkus:devThe application runs in dev mode, meaning that you can still update the code. It will reload it automatically.
In another terminal, emit a few HTTP POST request such as:
curl --header "Content-Type: application/json" \
--request POST \
--data '{"year":1994, "title":"The Shawshank Redemption"}' \
http://localhost:8080/

curl --header "Content-Type: application/json" \
--request POST \
--data '{"year":1972, "title":"The Godfather"}' \
http://localhost:8080/

curl --header "Content-Type: application/json" \
--request POST \
--data '{"year":2008, "title":"The Dark Knight"}' \
http://localhost:8080/

curl --header "Content-Type: application/json" \
--request POST \
--data '{"year":1994, "title":"Pulp Fiction"}' \
http://localhost:8080/

curl --header "Content-Type: application/json" \
--request POST \
--data '{"year":2010, "title":"Inception"}' \
http://localhost:8080/
In the terminal running the application, you will see:
...
2021-01-27 09:29:41,087 INFO  [org.acm.MovieConsumer] (vert.x-eventloop-thread-9) Got a movie: 1994 - Pulp Fiction
2021-01-27 09:29:41,114 INFO  [org.acm.MovieConsumer] (vert.x-eventloop-thread-9) Got a movie: 2010 - Inception
...
It works!
Step 8 - Native packaging
If you have GraalVM installed and configured correctly, you can package this application as a native executable:
./mvnw package -PnativeThen, execute your native executable with: ./target/getting-started-amqp-1.0.0-SNAPSHOT-runner, and you get a Quarkus application using AMQP starting in a few milliseconds and consuming a ridiculous amount of memory: only 33Mb after 100 ingested records!
$ rss getting-started-amqp-1.0.0-SNAPSHOT-runner
PID 0M COMMAND
54986 33M ./target/getting-started-amqp-1.0.0-SNAPSHOT-runner
Summary
In less than 10 minutes, we have a new Quarkus application using AMQP. If you want to go further, check the AMQP guide.