OpenID Connect (OIDC) Bearer token authentication
Secure HTTP access to Jakarta REST (formerly known as JAX-RS) endpoints in your application with Bearer token authentication by using the Quarkus OpenID Connect (OIDC) extension.
Overview of the Bearer token authentication mechanism in Quarkus
Quarkus supports the Bearer token authentication mechanism through the Quarkus OpenID Connect (OIDC) extension.
The bearer tokens are issued by OIDC and OAuth 2.0 compliant authorization servers, such as Keycloak.
Bearer token authentication is the process of authorizing HTTP requests based on the existence and validity of a bearer token. The bearer token provides information about the subject of the call, which is used to determine whether or not an HTTP resource can be accessed.
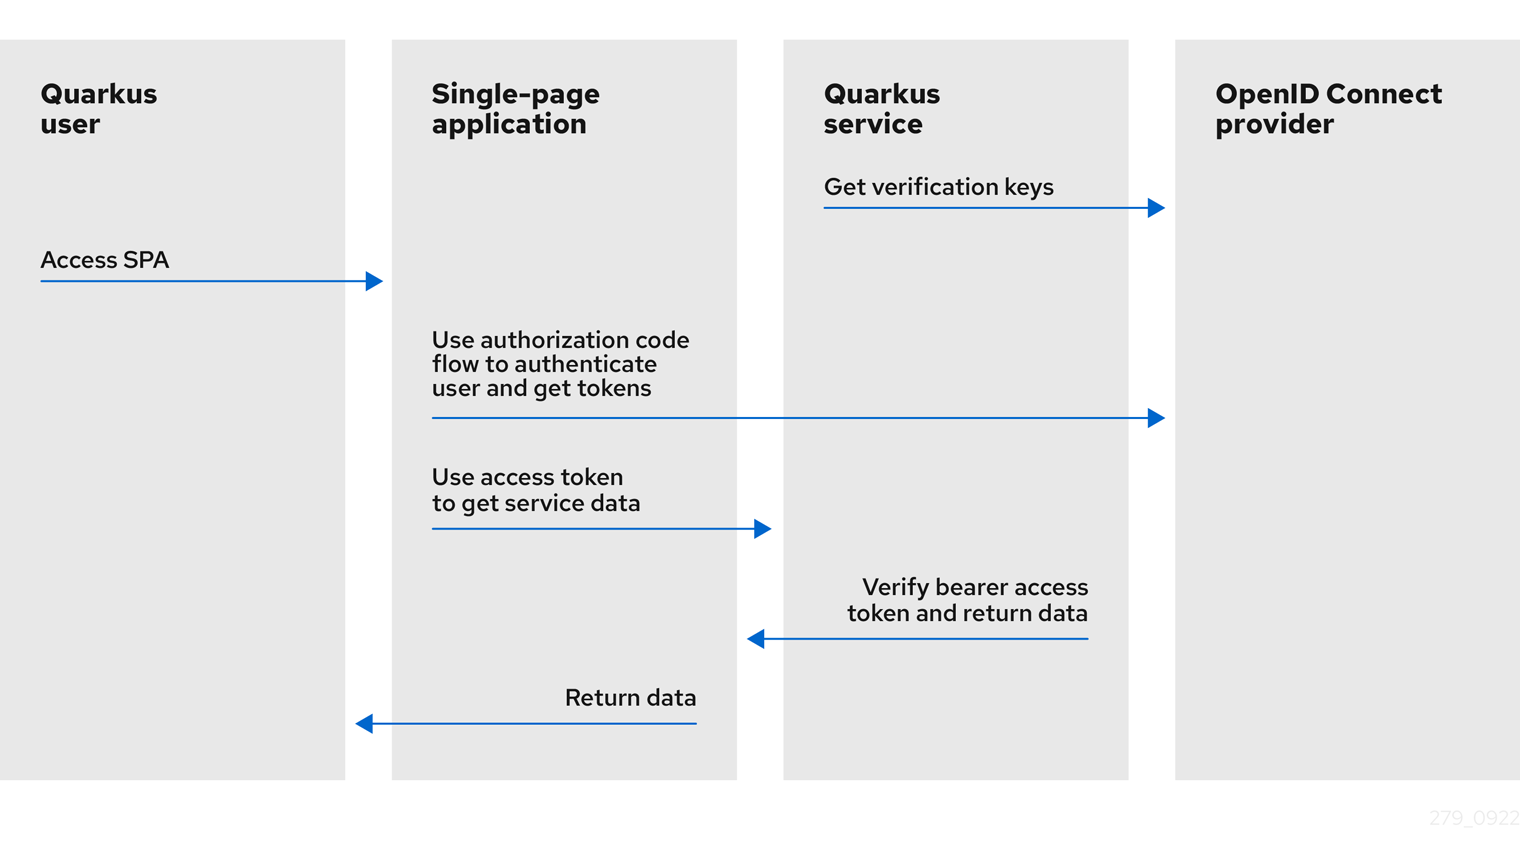
The following diagrams outline the Bearer token authentication mechanism in Quarkus:
-
The Quarkus service retrieves verification keys from the OIDC provider. The verification keys are used to verify the bearer access token signatures.
-
The Quarkus user accesses the single-page application (SPA).
-
The single-page application uses Authorization Code Flow to authenticate the user and retrieve tokens from the OIDC provider.
-
The single-page application uses the access token to retrieve the service data from the Quarkus service.
-
The Quarkus service verifies the bearer access token signature by using the verification keys, checks the token expiry date and other claims, allows the request to proceed if the token is valid, and returns the service response to the single-page application.
-
The single-page application returns the same data to the Quarkus user.
-
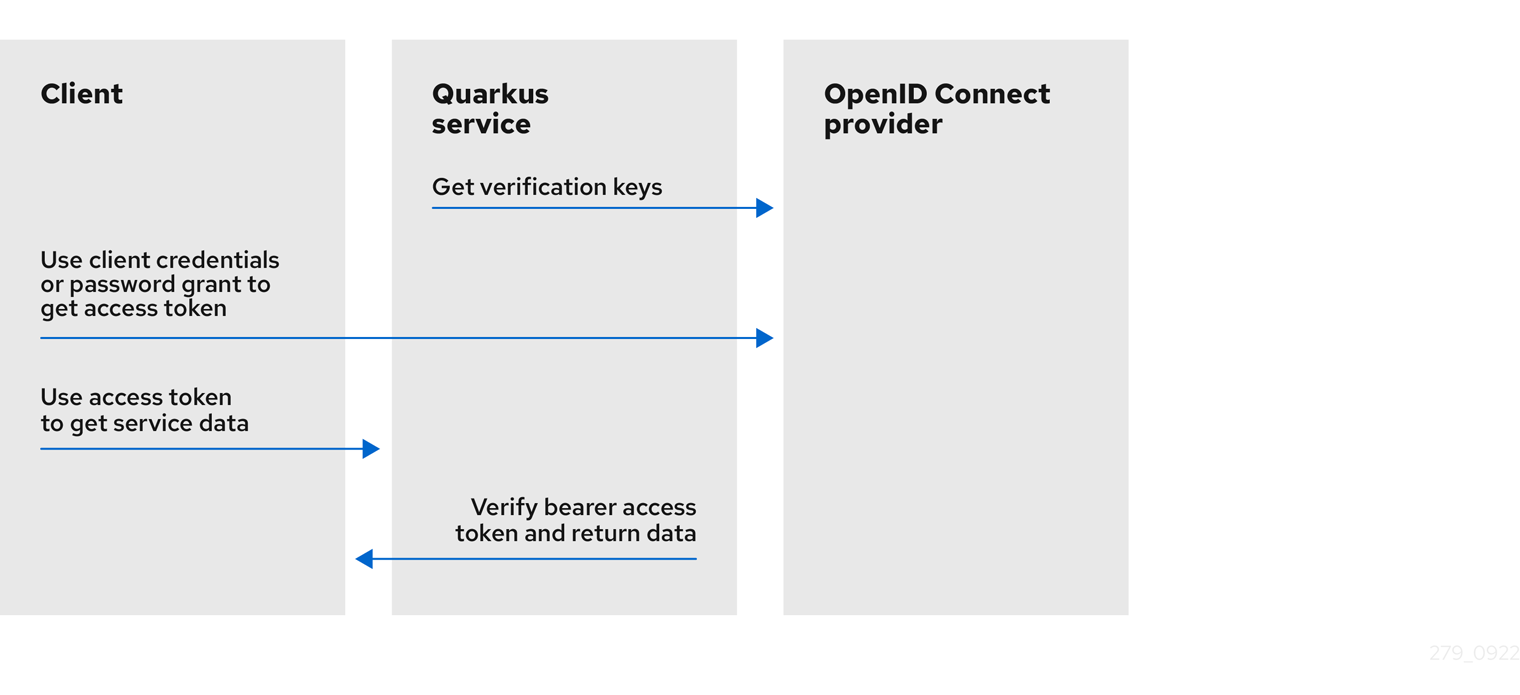
The Quarkus service retrieves verification keys from the OIDC provider. The verification keys are used to verify the bearer access token signatures.
-
The client uses
client_credentialsthat requires client id and secret or password grant, which requires client id, secret, username, and password to retrieve the access token from the OIDC provider. -
The client uses the access token to retrieve the service data from the Quarkus service.
-
The Quarkus service verifies the bearer access token signature by using the verification keys, checks the token expiry date and other claims, allows the request to proceed if the token is valid, and returns the service response to the client.
If you need to authenticate and authorize users by using OIDC authorization code flow, see the Quarkus OpenID Connect authorization code flow mechanism for protecting web applications guide. Also, if you use Keycloak and bearer tokens, see the Quarkus Using Keycloak to centralize authorization guide.
To learn about how you can protect service applications by using OIDC Bearer token authentication, see the following tutorial:
For information about how to support multiple tenants, see the Quarkus Using OpenID Connect Multi-Tenancy guide.
Accessing JWT claims
If you need to access JWT token claims, you can inject JsonWebToken:
package org.acme.security.openid.connect;

import org.eclipse.microprofile.jwt.JsonWebToken;
import jakarta.inject.Inject;
import jakarta.annotation.security.RolesAllowed;
import jakarta.ws.rs.GET;
import jakarta.ws.rs.Path;
import jakarta.ws.rs.Produces;
import jakarta.ws.rs.core.MediaType;

@Path("/api/admin")
public class AdminResource {

    @Inject
    JsonWebToken jwt;

    @GET
    @RolesAllowed("admin")
    @Produces(MediaType.TEXT_PLAIN)
    public String admin() {
        return "Access for subject " + jwt.getSubject() + " is granted";
    }
}
Injection of JsonWebToken is supported in @ApplicationScoped, @Singleton, and @RequestScoped scopes.
However, the use of @RequestScoped is required if the individual claims are injected as simple types.
For more information, see the Supported injection scopes section of the Quarkus "Using JWT RBAC" guide.
UserInfo
If you must request a UserInfo JSON object from the OIDC UserInfo endpoint, set quarkus.oidc.authentication.user-info-required=true.
A request is sent to the OIDC provider UserInfo endpoint, and an io.quarkus.oidc.UserInfo (a simple javax.json.JsonObject wrapper) object is created.
io.quarkus.oidc.UserInfo can be injected or accessed as a SecurityIdentity userinfo attribute.
quarkus.oidc.authentication.user-info-required is automatically enabled if one of these conditions is met:
-
if
quarkus.oidc.roles.sourceis set touserinfoorquarkus.oidc.token.verify-access-token-with-user-infois set totrueorquarkus.oidc.authentication.id-token-requiredis set tofalse, the current OIDC tenant must support a UserInfo endpoint in these cases. -
if
io.quarkus.oidc.UserInfoinjection point is detected but only if the current OIDC tenant supports a UserInfo endpoint.
Configuration metadata
The current tenant’s discovered OpenID Connect Configuration Metadata is represented by io.quarkus.oidc.OidcConfigurationMetadata and can be injected or accessed as a SecurityIdentity configuration-metadata attribute.
The default tenant’s OidcConfigurationMetadata is injected if the endpoint is public.
Token claims and SecurityIdentity roles
You can map SecurityIdentity roles from the verified JWT access tokens as follows:
-
If the
quarkus.oidc.roles.role-claim-pathproperty is set, and matching array or string claims are found, then the roles are extracted from these claims. For example,customroles,customroles/array,scope,"http://namespace-qualified-custom-claim"/roles,"http://namespace-qualified-roles". -
If a
groupsclaim is available, then its value is used. -
If a
realm_access/rolesorresource_access/client_id/roles(whereclient_idis the value of thequarkus.oidc.client-idproperty) claim is available, then its value is used. This check supports the tokens issued by Keycloak.
For example, the following JWT token has a complex groups claim that contains a roles array that includes roles:
{
    "iss": "https://server.example.com",
    "sub": "24400320",
    "upn": "jdoe@example.com",
    "preferred_username": "jdoe",
    "exp": 1311281970,
    "iat": 1311280970,
    "groups": {
        "roles": [
          "microprofile_jwt_user"
        ],
    }
}
You must map the microprofile_jwt_user role to SecurityIdentity roles, and you can do so with this configuration: quarkus.oidc.roles.role-claim-path=groups/roles.
If the token is opaque (binary), then a scope property from the remote token introspection response is used.
If UserInfo is the source of the roles, then set quarkus.oidc.authentication.user-info-required=true and quarkus.oidc.roles.source=userinfo, and if needed, set quarkus.oidc.roles.role-claim-path.
Additionally, a custom SecurityIdentityAugmentor can also be used to add the roles.
For more information, see the Security identity customization section of the Quarkus "Security tips and tricks" guide.
You can also map SecurityIdentity roles created from token claims to deployment-specific roles by using the HTTP Security policy.
Token scopes and SecurityIdentity permissions
SecurityIdentity permissions are mapped in the form of io.quarkus.security.StringPermission from the scope parameter of the source of the roles and using the same claim separator.
import java.util.List;
import jakarta.inject.Inject;
import jakarta.ws.rs.GET;
import jakarta.ws.rs.Path;

import org.eclipse.microprofile.jwt.Claims;
import org.eclipse.microprofile.jwt.JsonWebToken;

import io.quarkus.security.PermissionsAllowed;

@Path("/service")
public class ProtectedResource {

    @Inject
    JsonWebToken accessToken;

    @PermissionsAllowed("email") (1)
    @GET
    @Path("/email")
    public Boolean isUserEmailAddressVerifiedByUser() {
        return accessToken.getClaim(Claims.email_verified.name());
    }

    @PermissionsAllowed("orders_read") (2)
    @GET
    @Path("/order")
    public List<Order> listOrders() {
        return List.of(new Order("1"));
    }

    public static class Order {
        String id;
        public Order() {
        }
        public Order(String id) {
            this.id = id;
        }
        public String getId() {
            return id;
        }
        public void setId() {
            this.id = id;
        }
    }
}| 1 | Only requests with OpenID Connect scope email will be granted access. |
| 2 | The read access is limited to the client requests with the orders_read scope. |
For more information about the io.quarkus.security.PermissionsAllowed annotation, see the Permission annotation section of the "Authorization of web endpoints" guide.
Token verification and introspection
If the token is a JWT token, then, by default, it is verified with a JsonWebKey (JWK) key from a local JsonWebKeySet, retrieved from the OIDC provider’s JWK endpoint.
The token’s key identifier (kid) header value is used to find the matching JWK key.
If no matching JWK is available locally, then JsonWebKeySet is refreshed by fetching the current key set from the JWK endpoint.
The JsonWebKeySet refresh can be repeated only after the quarkus.oidc.token.forced-jwk-refresh-interval expires.
The default expiry time is 10 minutes.
If no matching JWK is available after the refresh, the JWT token is sent to the OIDC provider’s token introspection endpoint.
If the token is opaque, which means it can be a binary token or an encrypted JWT token, then it is always sent to the OIDC provider’s token introspection endpoint.
If you work only with JWT tokens and expect a matching JsonWebKey to always be available, for example, after refreshing a key set, you must disable token introspection, as shown in the following example:
quarkus.oidc.token.allow-jwt-introspection=false
quarkus.oidc.token.allow-opaque-token-introspection=false
There might be cases where JWT tokens must be verified through introspection only, which can be forced by configuring an introspection endpoint address only. The following properties configuration shows you an example of how you can achieve this with Keycloak:
quarkus.oidc.auth-server-url=http://localhost:8180/realms/quarkus
quarkus.oidc.discovery-enabled=false
# Token Introspection endpoint: http://localhost:8180/realms/quarkus/protocol/openid-connect/tokens/introspect
quarkus.oidc.introspection-path=/protocol/openid-connect/tokens/introspect
There are advantages and disadvantages to indirectly enforcing the introspection of JWT tokens remotely. An advantage is that you eliminate the need for two remote calls: a remote OIDC metadata discovery call followed by another remote call to fetch the verification keys that will not be used. A disadvantage is that you need to know the introspection endpoint address and configure it manually.
The alternative approach is to allow the default option of OIDC metadata discovery but also require that only the remote JWT introspection is performed, as shown in the following example:
quarkus.oidc.auth-server-url=http://localhost:8180/realms/quarkus
quarkus.oidc.token.require-jwt-introspection-only=true
An advantage of this approach is that the configuration is simpler and easier to understand. A disadvantage is that a remote OIDC metadata discovery call is required to discover an introspection endpoint address, even though the verification keys will not be fetched.
The io.quarkus.oidc.TokenIntrospection, a simple jakarta.json.JsonObject wrapper object, will be created.
It can be injected or accessed as a SecurityIdentity introspection attribute, providing either the JWT or opaque token has been successfully introspected.
Token introspection and UserInfo cache
All opaque access tokens must be remotely introspected.
Sometimes, JWT access tokens might also have to be introspected.
If UserInfo is also required, the same access token is used in a subsequent remote call to the OIDC provider.
So, if UserInfo is required, and the current access token is opaque, two remote calls are made for every such token; one remote call to introspect the token and another to get UserInfo.
If the token is JWT, only a single remote call to get UserInfo is needed, unless it also has to be introspected.
The cost of making up to two remote calls for every incoming bearer or code flow access token can sometimes be problematic.
If this is the case in production, consider caching the token introspection and UserInfo data for a short period, for example, 3 or 5 minutes.
quarkus-oidc provides quarkus.oidc.TokenIntrospectionCache and quarkus.oidc.UserInfoCache interfaces, usable for @ApplicationScoped cache implementation.
Use @ApplicationScoped cache implementation to store and retrieve quarkus.oidc.TokenIntrospection and/or quarkus.oidc.UserInfo objects, as outlined in the following example:
@ApplicationScoped
@Alternative
@Priority(1)
public class CustomIntrospectionUserInfoCache implements TokenIntrospectionCache, UserInfoCache {
...
}
Each OIDC tenant can either permit or deny the storing of its quarkus.oidc.TokenIntrospection data, quarkus.oidc.UserInfo data, or both with boolean quarkus.oidc."tenant".allow-token-introspection-cache and quarkus.oidc."tenant".allow-user-info-cache properties.
Additionally, quarkus-oidc provides a simple default memory-based token cache, which implements both quarkus.oidc.TokenIntrospectionCache and quarkus.oidc.UserInfoCache interfaces.
You can configure and activate the default OIDC token cache as follows:
# 'max-size' is 0 by default, so the cache can be activated by setting 'max-size' to a positive value:
quarkus.oidc.token-cache.max-size=1000
# 'time-to-live' specifies how long a cache entry can be valid for and will be used by a cleanup timer:
quarkus.oidc.token-cache.time-to-live=3M
# 'clean-up-timer-interval' is not set by default, so the cleanup timer can be activated by setting 'clean-up-timer-interval':
quarkus.oidc.token-cache.clean-up-timer-interval=1M
The default cache uses a token as a key, and each entry can have TokenIntrospection, UserInfo, or both.
It will only keep up to a max-size number of entries.
If the cache is already full when a new entry is to be added, an attempt is made to find a space by removing a single expired entry.
Additionally, the cleanup timer, if activated, periodically checks for expired entries and removes them.
You can experiment with the default cache implementation or register a custom one.
JSON Web Token claim verification
After the bearer JWT token’s signature has been verified and its expires at (exp) claim has been checked, the iss (issuer) claim value is verified next.
By default, the iss claim value is compared to the issuer property, which might have been discovered in the well-known provider configuration.
However, if the quarkus.oidc.token.issuer property is set, then the iss claim value is compared to it instead.
In some cases, this iss claim verification might not work.
For example, if the discovered issuer property contains an internal HTTP/IP address while the token iss claim value contains an external HTTP/IP address.
Or when a discovered issuer property contains the template tenant variable, but the token iss claim value has the complete tenant-specific issuer value.
In such cases, consider skipping the issuer verification by setting quarkus.oidc.token.issuer=any.
Only skip the issuer verification if no other options are available:
-
If you are using Keycloak and observe the issuer verification errors caused by the different host addresses, configure Keycloak with a
KEYCLOAK_FRONTEND_URLproperty to ensure the same host address is used. -
If the
issproperty is tenant-specific in a multitenant deployment, use theSecurityIdentitytenant-idattribute to check that the issuer is correct in the endpoint or the custom Jakarta filter. For example:
import jakarta.inject.Inject;
import jakarta.ws.rs.container.ContainerRequestContext;
import jakarta.ws.rs.container.ContainerRequestFilter;
import jakarta.ws.rs.core.Response;
import jakarta.ws.rs.ext.Provider;

import org.eclipse.microprofile.jwt.JsonWebToken;
import io.quarkus.oidc.OidcConfigurationMetadata;
import io.quarkus.security.identity.SecurityIdentity;

@Provider
public class IssuerValidator implements ContainerRequestFilter {
    @Inject
    OidcConfigurationMetadata configMetadata;

    @Inject JsonWebToken jwt;
    @Inject SecurityIdentity identity;

    public void filter(ContainerRequestContext requestContext) {
        String issuer = configMetadata.getIssuer().replace("{tenant-id}", identity.getAttribute("tenant-id"));
        if (!issuer.equals(jwt.getIssuer())) {
            requestContext.abortWith(Response.status(401).build());
        }
    }
}|
Consider using the |
Jose4j Validator
You can register a custom Jose4j Validator to customize the JWT claim verification process, before org.eclipse.microprofile.jwt.JsonWebToken is initialized.
For example:
package org.acme.security.openid.connect;

import static org.eclipse.microprofile.jwt.Claims.iss;

import io.quarkus.arc.Unremovable;
import jakarta.enterprise.context.ApplicationScoped;

import org.jose4j.jwt.MalformedClaimException;
import org.jose4j.jwt.consumer.JwtContext;
import org.jose4j.jwt.consumer.Validator;

@Unremovable
@ApplicationScoped
public class IssuerValidator implements Validator { (1)

    @Override
    public String validate(JwtContext jwtContext) throws MalformedClaimException {
        if (jwtContext.getJwtClaims().hasClaim(iss.name())
                && "my-issuer".equals(jwtContext.getJwtClaims().getClaimValueAsString(iss.name()))) {
            return "wrong issuer"; (2)
        }
        return null; (3)
    }
}| 1 | Register Jose4j Validator to verify JWT tokens for all OIDC tenants. |
| 2 | Return the claim verification error description. |
| 3 | Return null to confirm that this Validator has successfully verified the token. |
Use a @quarkus.oidc.TenantFeature annotation to bind a custom Validator to a specific OIDC tenant only.
|
Single-page applications
A single-page application (SPA) typically uses XMLHttpRequest(XHR) and the JavaScript utility code provided by the OIDC provider to acquire a bearer token to access Quarkus service applications.
For example, if you work with Keycloak, you can use keycloak.js to authenticate users and refresh the expired tokens from the SPA:
<html>
<head>
    <title>keycloak-spa</title>
    <script src="https://cdn.jsdelivr.net/npm/axios/dist/axios.min.js"></script>
    <script type="importmap">
        {
            "imports": {
                "keycloak-js": "https://cdn.jsdelivr.net/npm/keycloak-js@26.0.7/lib/keycloak.js"
            }
        }
    </script>
    <script type="module">
        import Keycloak from "keycloak-js";

        const keycloak = new Keycloak({
            url: 'http://localhost:8180',
            realm: 'quarkus',
            clientId: 'quarkus-app'
        });

        await keycloak.init({onLoad: 'login-required'}).then(function () {
            console.log('User is now authenticated.');
        }).catch(function () {
            console.log('User is NOT authenticated.');
        });

        function makeAjaxRequest() {
            axios.get("/api/hello", {
                headers: {
                    'Authorization': 'Bearer ' + keycloak.token
                }
            })
            .then( function (response) {
                console.log("Response: ", response.status);
            }).catch(function (error) {
                console.log('refreshing');
                keycloak.updateToken(5).then(function () {
                    console.log('Token refreshed');
                }).catch(function () {
                    console.log('Failed to refresh token');
                    window.location.reload();
                });
            });
        }

        let button = document.getElementById('ajax-request');
        button.addEventListener('click', makeAjaxRequest);
    </script>
</head>
<body>
    <button id="ajax-request">Request</button>
</body>
</html>|
To enable authentication for this SPA Keycloak example, disable Client authentication and set Web origins to |
Cross-origin resource sharing
If you plan to use your OIDC service application from a single-page application running on a different domain, you must configure cross-origin resource sharing (CORS).
For more information, see the CORS filter section of the "Cross-origin resource sharing" guide.
Provider endpoint configuration
An OIDC service application needs to know the OIDC provider’s token, JsonWebKey (JWK) set, and possibly UserInfo and introspection endpoint addresses.
By default, they are discovered by adding a /.well-known/openid-configuration path to the configured quarkus.oidc.auth-server-url.
Alternatively, if the discovery endpoint is not available, or if you want to save on the discovery endpoint round-trip, you can disable the discovery and configure them with relative path values. For example:
quarkus.oidc.auth-server-url=http://localhost:8180/realms/quarkus
quarkus.oidc.discovery-enabled=false
# Token endpoint: http://localhost:8180/realms/quarkus/protocol/openid-connect/token
quarkus.oidc.token-path=/protocol/openid-connect/token
# JWK set endpoint: http://localhost:8180/realms/quarkus/protocol/openid-connect/certs
quarkus.oidc.jwks-path=/protocol/openid-connect/certs
# UserInfo endpoint: http://localhost:8180/realms/quarkus/protocol/openid-connect/userinfo
quarkus.oidc.user-info-path=/protocol/openid-connect/userinfo
# Token Introspection endpoint: http://localhost:8180/realms/quarkus/protocol/openid-connect/tokens/introspect
quarkus.oidc.introspection-path=/protocol/openid-connect/tokens/introspect
Token propagation
For information about bearer access token propagation to the downstream services, see the Token propagation section of the Quarkus "OpenID Connect (OIDC) and OAuth2 client and filters reference" guide.
JWT token certificate chain
In some cases, JWT bearer tokens have an x5c header which represents an X509 certificate chain whose leaf certificate contains a public key that must be used to verify this token’s signature.
Before this public key can be accepted to verify the signature, the certificate chain must be validated first.
The certificate chain validation involves several steps:
-
Confirm that every certificate but the root one is signed by the parent certificate.
-
Confirm the chain’s root certificate is also imported in the truststore.
-
Validate the chain’s leaf certificate. If a common name of the leaf certificate is configured then a common name of the chain’s leaf certificate must match it. Otherwise the chain’s leaf certificate must also be avaiable in the truststore, unless one or more custom
TokenCertificateValidatorimplementations are registered. -
quarkus.oidc.TokenCertificateValidatorcan be used to add a custom certificate chain validation step. It can be used by all tenants expecting tokens with the certificate chain or bound to specific OIDC tenants with the@quarkus.oidc.TenantFeatureannotation.
For example, here is how you can configure Quarkus OIDC to verify the token’s certificate chain, without using quarkus.oidc.TokenCertificateValidator:
quarkus.oidc.certificate-chain.trust-store-file=truststore-rootcert.p12 (1)
quarkus.oidc.certificate-chain.trust-store-password=storepassword
quarkus.oidc.certificate-chain.leaf-certificate-name=www.quarkusio.com (2)| 1 | The truststore must contain the certificate chain’s root certificate. |
| 2 | The certificate chain’s leaf certificate must have a common name equal to www.quarkusio.com. If this property is not configured then the truststore must contain the certificate chain’s leaf certificate unless one or more custom TokenCertificateValidator implementations are registered. |
You can add a custom certificate chain validation step by registering a custom quarkus.oidc.TokenCertificateValidator, for example:
package io.quarkus.it.keycloak;

import java.security.cert.CertificateException;
import java.security.cert.X509Certificate;
import java.util.List;

import jakarta.enterprise.context.ApplicationScoped;

import io.quarkus.arc.Unremovable;
import io.quarkus.oidc.OidcTenantConfig;
import io.quarkus.oidc.TokenCertificateValidator;
import io.quarkus.oidc.runtime.TrustStoreUtils;
import io.vertx.core.json.JsonObject;

@ApplicationScoped
@Unremovable
public class BearerGlobalTokenChainValidator implements TokenCertificateValidator {

    @Override
    public void validate(OidcTenantConfig oidcConfig, List<X509Certificate> chain, String tokenClaims) throws CertificateException {
        String rootCertificateThumbprint = TrustStoreUtils.calculateThumprint(chain.get(chain.size() - 1));
        JsonObject claims = new JsonObject(tokenClaims);
        if (!rootCertificateThumbprint.equals(claims.getString("root-certificate-thumbprint"))) { (1)
            throw new CertificateException("Invalid root certificate");
        }
    }
}| 1 | Confirm that the certificate chain’s root certificate is bound to the custom JWT token’s claim. |
OIDC provider client authentication
quarkus.oidc.runtime.OidcProviderClient is used when a remote request to an OIDC provider is required.
If introspection of the Bearer token is necessary, then OidcProviderClient must authenticate to the OIDC provider.
For more information about supported authentication options, see the OIDC provider client authentication section in the Quarkus "OpenID Connect authorization code flow mechanism for protecting web applications" guide.
Probando
|
If you have to test Quarkus OIDC service endpoints that require Keycloak authorization, follow the Test Keycloak authorization section. |
You can begin testing by adding the following dependencies to your test project:
<dependency>
    <groupId>io.rest-assured</groupId>
    <artifactId>rest-assured</artifactId>
    <scope>test</scope>
</dependency>
<dependency>
    <groupId>io.quarkus</groupId>
    <artifactId>quarkus-junit</artifactId>
    <scope>test</scope>
</dependency>testImplementation("io.rest-assured:rest-assured")
testImplementation("io.quarkus:quarkus-junit")Dev Services for Keycloak
The preferred approach for integration testing against Keycloak is Dev Services for Keycloak.
Dev Services for Keycloak will start and initialize a test container.
Then, it will create a quarkus realm and a quarkus-app client with secret as the client secret. It will also add two users: alice with both admin and user roles, and bob with the user role. All of these properties can be customized.
First, add the following dependency, which provides a utility class io.quarkus.test.keycloak.client.KeycloakTestClient that you can use in tests for acquiring the access tokens:
<dependency>
    <groupId>io.quarkus</groupId>
    <artifactId>quarkus-test-keycloak-server</artifactId>
    <scope>test</scope>
</dependency>testImplementation("io.quarkus:quarkus-test-keycloak-server")Next, prepare your application.properties configuration file.
You can start with an empty application.properties file because Dev Services for Keycloak registers quarkus.oidc.auth-server-url and points it to the running test container, quarkus.oidc.client-id=quarkus-app, and quarkus.oidc.credentials.secret=secret.
However, if you have already configured the required quarkus-oidc properties, then you only need to associate quarkus.oidc.auth-server-url with the prod profile for Dev Services for Keycloak to start a container, as shown in the following example:
%prod.quarkus.oidc.auth-server-url=http://localhost:8180/realms/quarkusIf a custom realm file has to be imported into Keycloak before running the tests, configure Dev Services for Keycloak as follows:
%prod.quarkus.oidc.auth-server-url=http://localhost:8180/realms/quarkus
quarkus.keycloak.devservices.realm-path=quarkus-realm.json
Finally, write your test, which will be executed in JVM mode, as shown in the following examples:
package org.acme.security.openid.connect;

import io.quarkus.test.junit.QuarkusTest;
import io.quarkus.test.keycloak.client.KeycloakTestClient;
import io.restassured.RestAssured;
import org.junit.jupiter.api.Test;

@QuarkusTest
public class BearerTokenAuthenticationTest {

    KeycloakTestClient keycloakClient = new KeycloakTestClient();

    @Test
    public void testAdminAccess() {
        RestAssured.given().auth().oauth2(getAccessToken("alice"))
                .when().get("/api/admin")
                .then()
                .statusCode(200);
        RestAssured.given().auth().oauth2(getAccessToken("bob"))
                .when().get("/api/admin")
                .then()
                .statusCode(403);
    }

    protected String getAccessToken(String userName) {
        return keycloakClient.getAccessToken(userName);
    }
}package org.acme.security.openid.connect;
import io.quarkus.test.junit.QuarkusIntegrationTest;
@QuarkusIntegrationTest
public class NativeBearerTokenAuthenticationIT extends BearerTokenAuthenticationTest {
}For more information about initializing and configuring Dev Services for Keycloak, see the Dev Services for Keycloak guide.
WireMock
Add the following dependencies to your test project:
<dependency>
    <groupId>io.quarkus</groupId>
    <artifactId>quarkus-test-oidc-server</artifactId>
    <scope>test</scope>
</dependency>testImplementation("io.quarkus:quarkus-test-oidc-server")Prepare the REST test endpoint and set application.properties.
For example:
# keycloak.url is set by OidcWiremockTestResource
quarkus.oidc.auth-server-url=${keycloak.url:replaced-by-test-resource}/realms/quarkus/
quarkus.oidc.client-id=quarkus-service-app
quarkus.oidc.application-type=service
Finally, write the test code. For example:
import static org.hamcrest.Matchers.equalTo;

import java.util.Set;

import org.junit.jupiter.api.Test;

import io.quarkus.test.common.QuarkusTestResource;
import io.quarkus.test.junit.QuarkusTest;
import io.quarkus.test.oidc.server.OidcWiremockTestResource;
import io.restassured.RestAssured;
import io.smallrye.jwt.build.Jwt;

@QuarkusTest
@QuarkusTestResource(OidcWiremockTestResource.class)
public class BearerTokenAuthorizationTest {

    @Test
    public void testBearerToken() {
        RestAssured.given().auth().oauth2(getAccessToken("alice", Set.of("user")))
            .when().get("/api/users/me")
            .then()
            .statusCode(200)
            // The test endpoint returns the name extracted from the injected `SecurityIdentity` principal.
            .body("userName", equalTo("alice"));
    }

    private String getAccessToken(String userName, Set<String> groups) {
        return Jwt.preferredUserName(userName)
                .groups(groups)
                .issuer("https://server.example.com")
                .audience("https://service.example.com")
                .sign();
    }
}
The quarkus-test-oidc-server extension includes a signing RSA private key file in a JSON Web Key (JWK) format and points to it with a smallrye.jwt.sign.key.location configuration property.
It allows you to sign the token by using a no-argument sign() operation.
Testing your quarkus-oidc service application with OidcWiremockTestResource provides the best coverage because even the communication channel is tested against the WireMock HTTP stubs.
If you need to run a test with WireMock stubs that are not yet supported by OidcWiremockTestResource, you can inject a WireMockServer instance into the test class, as shown in the following example:
|
|
package io.quarkus.it.keycloak;

import static com.github.tomakehurst.wiremock.client.WireMock.matching;
import static org.hamcrest.Matchers.equalTo;

import org.junit.jupiter.api.Test;

import com.github.tomakehurst.wiremock.WireMockServer;
import com.github.tomakehurst.wiremock.client.WireMock;

import io.quarkus.test.junit.QuarkusTest;
import io.quarkus.test.oidc.server.OidcWireMock;
import io.restassured.RestAssured;

@QuarkusTest
public class CustomOidcWireMockStubTest {

    @OidcWireMock
    WireMockServer wireMockServer;

    @Test
    public void testInvalidBearerToken() {
        wireMockServer.stubFor(WireMock.post("/auth/realms/quarkus/protocol/openid-connect/token/introspect")
                .withRequestBody(matching(".*token=invalid_token.*"))
                .willReturn(WireMock.aResponse().withStatus(400)));

        RestAssured.given().auth().oauth2("invalid_token").when()
                .get("/api/users/me/bearer")
                .then()
                .statusCode(401)
                .header("WWW-Authenticate", equalTo("Bearer"));
    }
}
OidcTestClient
If you use SaaS OIDC providers, such as Auth0, and want to run tests against the test (development) domain or to run tests against a remote Keycloak test realm, if you already have quarkus.oidc.auth-server-url configured, you can use OidcTestClient.
For example, you have the following configuration:
%test.quarkus.oidc.auth-server-url=https://dev-123456.eu.auth0.com/
%test.quarkus.oidc.client-id=test-auth0-client
%test.quarkus.oidc.credentials.secret=secret
To start, add the same dependency, quarkus-test-oidc-server, as described in the WireMock section.
Next, write the test code as follows:
package org.acme;

import org.junit.jupiter.api.AfterAll;
import static io.restassured.RestAssured.given;
import static org.hamcrest.CoreMatchers.is;

import java.util.Map;

import org.junit.jupiter.api.Test;

import io.quarkus.test.junit.QuarkusTest;
import io.quarkus.test.oidc.client.OidcTestClient;

@QuarkusTest
public class GreetingResourceTest {

    static OidcTestClient oidcTestClient = new OidcTestClient();

    @AfterAll
    public static void close() {
        oidcTestClient.close();
    }

    @Test
    public void testHelloEndpoint() {
        given()
          .auth().oauth2(getAccessToken("alice", "alice"))
          .when().get("/hello")
          .then()
             .statusCode(200)
             .body(is("Hello, Alice"));
    }

    private String getAccessToken(String name, String secret) {
        return oidcTestClient.getAccessToken(name, secret,
            Map.of("audience", "https://dev-123456.eu.auth0.com/api/v2/",
	           "scope", "profile"));
    }
}
This test code acquires a token by using a password grant from the test Auth0 domain, which has registered an application with the client id test-auth0-client, and created the user alice with password alice.
For a test like this to work, the test Auth0 application must have the password grant enabled.
This example code also shows how to pass additional parameters.
For Auth0, these are the audience and scope parameters.
Test OIDC DevService
You can also use OidcTestClient to test Quarkus endpoints supported by Dev Services for OIDC.
No configuration in the application.properties file is needed, Quarkus will configure OidcTestClient for you:
package org.acme;

import static io.restassured.RestAssured.given;
import static org.hamcrest.CoreMatchers.is;

import org.junit.jupiter.api.AfterAll;
import org.junit.jupiter.api.Test;

import io.quarkus.test.junit.QuarkusTest;
import io.quarkus.test.oidc.client.OidcTestClient;

@QuarkusTest
public class GreetingResourceTest {

    static final OidcTestClient oidcTestClient = new OidcTestClient();

    @AfterAll
    public static void close() {
        oidcTestClient.close();
    }

    @Test
    public void testHelloEndpoint() {
        String accessToken = oidcTestClient.getAccessToken("alice", "alice");
        given()
          .auth().oauth2(accessToken)
          .when().get("/hello")
          .then()
             .statusCode(200)
             .body(is("Hello, Alice"));
    }

}
KeycloakTestResourceLifecycleManager
You can also use KeycloakTestResourceLifecycleManager for integration testing with Keycloak.
|
Use Dev Services for Keycloak instead of |
First, add the following dependency:
<dependency>
    <groupId>io.quarkus</groupId>
    <artifactId>quarkus-test-keycloak-server</artifactId>
    <scope>test</scope>
</dependency>testImplementation("io.quarkus:quarkus-test-keycloak-server")It provides io.quarkus.test.keycloak.server.KeycloakTestResourceLifecycleManager, which is an implementation of io.quarkus.test.common.QuarkusTestResourceLifecycleManager that starts a Keycloak container.
Configure the Maven Surefire plugin as follows, or similarly with maven.failsafe.plugin for native image testing:
<plugin>
    <artifactId>maven-surefire-plugin</artifactId>
    <configuration>
        <systemPropertyVariables>
            <!-- Or, alternatively, configure 'keycloak.version' -->
            <keycloak.docker.image>${keycloak.docker.image}</keycloak.docker.image>
            <!--
              Disable HTTPS if required:
              <keycloak.use.https>false</keycloak.use.https>
            -->
        </systemPropertyVariables>
    </configuration>
</plugin>
Prepare the REST test endpoint and set application.properties as outlined in the following example:
# keycloak.url is set by KeycloakTestResourceLifecycleManager
quarkus.oidc.auth-server-url=${keycloak.url:replaced-by-test-resource}/realms/quarkus/
quarkus.oidc.client-id=quarkus-service-app
quarkus.oidc.credentials=secret
quarkus.oidc.application-type=service
Finally, write the test code. For example:
import static io.quarkus.test.keycloak.server.KeycloakTestResourceLifecycleManager.getAccessToken;
import static org.hamcrest.Matchers.equalTo;

import org.junit.jupiter.api.Test;

import io.quarkus.test.common.QuarkusTestResource;
import io.quarkus.test.junit.QuarkusTest;
import io.quarkus.test.keycloak.server.KeycloakTestResourceLifecycleManager;
import io.restassured.RestAssured;

@QuarkusTest
@QuarkusTestResource(KeycloakTestResourceLifecycleManager.class)
public class BearerTokenAuthorizationTest {

    @Test
    public void testBearerToken() {
        RestAssured.given().auth().oauth2(getAccessToken("alice"))
            .when().get("/api/users/preferredUserName")
            .then()
            .statusCode(200)
            // The test endpoint returns the name extracted from the injected SecurityIdentity Principal
            .body("userName", equalTo("alice"));
    }

}In the provided example, KeycloakTestResourceLifecycleManager registers two users: alice and admin.
By default:
* The user alice has the user role, which you can customize by using a keycloak.token.user-roles system property.
* The user admin has both the user and admin roles, which you can customize by using the keycloak.token.admin-roles system property.
By default, KeycloakTestResourceLifecycleManager uses HTTPS to initialize a Keycloak instance, and this can be disabled by using keycloak.use.https=false.
The default realm name is quarkus, and the client id is quarkus-service-app.
If you want to customize these values, set the keycloak.realm and keycloak.service.client system properties.
Local public key
You can use a local inlined public key for testing your quarkus-oidc service applications, as shown in the following example:
quarkus.oidc.client-id=test
quarkus.oidc.public-key=MIIBIjANBgkqhkiG9w0BAQEFAAOCAQ8AMIIBCgKCAQEAlivFI8qB4D0y2jy0CfEqFyy46R0o7S8TKpsx5xbHKoU1VWg6QkQm+ntyIv1p4kE1sPEQO73+HY8+Bzs75XwRTYL1BmR1w8J5hmjVWjc6R2BTBGAYRPFRhor3kpM6ni2SPmNNhurEAHw7TaqszP5eUF/F9+KEBWkwVta+PZ37bwqSE4sCb1soZFrVz/UT/LF4tYpuVYt3YbqToZ3pZOZ9AX2o1GCG3xwOjkc4x0W7ezbQZdC9iftPxVHR8irOijJRRjcPDtA6vPKpzLl6CyYnsIYPd99ltwxTHjr3npfv/3Lw50bAkbT4HeLFxTx4flEoZLKO/g0bAoV2uqBhkA9xnQIDAQAB

smallrye.jwt.sign.key.location=/privateKey.pem
To generate JWT tokens, copy privateKey.pem from the integration-tests/oidc-tenancy in the main Quarkus repository and use a test code similar to the one in the preceding WireMock section.
You can use your own test keys, if preferred.
This approach provides limited coverage compared to the WireMock approach. For example, the remote communication code is not covered.
TestSecurity annotation
You can use @TestSecurity and @OidcSecurity annotations to test the service application endpoint code, which depends on either one, or all three, of the following injections:
-
JsonWebToken -
UserInfo -
OidcConfigurationMetadata
First, add the following dependency:
<dependency>
    <groupId>io.quarkus</groupId>
    <artifactId>quarkus-test-security-oidc</artifactId>
    <scope>test</scope>
</dependency>testImplementation("io.quarkus:quarkus-test-security-oidc")Write a test code as outlined in the following example:
import static org.hamcrest.Matchers.is;
import org.junit.jupiter.api.Test;
import io.quarkus.test.common.http.TestHTTPEndpoint;
import io.quarkus.test.junit.QuarkusTest;
import io.quarkus.test.security.TestSecurity;
import io.quarkus.test.security.oidc.Claim;
import io.quarkus.test.security.oidc.ConfigMetadata;
import io.quarkus.test.security.oidc.OidcSecurity;
import io.quarkus.test.security.oidc.UserInfo;
import io.restassured.RestAssured;

@QuarkusTest
@TestHTTPEndpoint(ProtectedResource.class)
public class TestSecurityAuthTest {

    @Test
    @TestSecurity(user = "userOidc", roles = "viewer")
    public void testOidc() {
        RestAssured.when().get("test-security-oidc").then()
                .body(is("userOidc:viewer"));
    }

    @Test
    @TestSecurity(user = "userOidc", roles = "viewer")
    @OidcSecurity(claims = {
            @Claim(key = "email", value = "user@gmail.com")
    }, userinfo = {
            @UserInfo(key = "sub", value = "subject")
    }, config = {
            @ConfigMetadata(key = "issuer", value = "issuer")
    })
    public void testOidcWithClaimsUserInfoAndMetadata() {
        RestAssured.when().get("test-security-oidc-claims-userinfo-metadata").then()
                .body(is("userOidc:viewer:user@gmail.com:subject:issuer"));
    }

}
The ProtectedResource class, which is used in this code example, might look like this:
import jakarta.inject.Inject;
import jakarta.ws.rs.GET;
import jakarta.ws.rs.Path;

import io.quarkus.oidc.OidcConfigurationMetadata;
import io.quarkus.oidc.UserInfo;
import io.quarkus.security.Authenticated;

import org.eclipse.microprofile.jwt.JsonWebToken;

@Path("/service")
@Authenticated
public class ProtectedResource {

    @Inject
    JsonWebToken accessToken;
    @Inject
    UserInfo userInfo;
    @Inject
    OidcConfigurationMetadata configMetadata;

    @GET
    @Path("test-security-oidc")
    public String testSecurityOidc() {
        return accessToken.getName() + ":" + accessToken.getGroups().iterator().next();
    }

    @GET
    @Path("test-security-oidc-claims-userinfo-metadata")
    public String testSecurityOidcWithClaimsUserInfoMetadata() {
        return accessToken.getName() + ":" + accessToken.getGroups().iterator().next()
                + ":" + accessToken.getClaim("email")
                + ":" + userInfo.getString("sub")
                + ":" + configMetadata.get("issuer");
    }
}
You must always use the @TestSecurity annotation.
Its user property is returned as JsonWebToken.getName() and its roles property is returned as JsonWebToken.getGroups().
The @OidcSecurity annotation is optional and you can use it to set the additional token claims and the UserInfo and OidcConfigurationMetadata properties.
Additionally, if the quarkus.oidc.token.issuer property is configured, it is used as an OidcConfigurationMetadata issuer property value.
If you work with opaque tokens, you can test them as shown in the following code example:
import static org.hamcrest.Matchers.is;
import org.junit.jupiter.api.Test;
import io.quarkus.test.common.http.TestHTTPEndpoint;
import io.quarkus.test.junit.QuarkusTest;
import io.quarkus.test.security.TestSecurity;
import io.quarkus.test.security.oidc.OidcSecurity;
import io.quarkus.test.security.oidc.TokenIntrospection;
import io.restassured.RestAssured;

@QuarkusTest
@TestHTTPEndpoint(ProtectedResource.class)
public class TestSecurityAuthTest {

    @Test
    @TestSecurity(user = "userOidc", roles = "viewer")
    @OidcSecurity(introspectionRequired = true,
        introspection = {
            @TokenIntrospection(key = "email", value = "user@gmail.com")
        }
    )
    public void testOidcWithClaimsUserInfoAndMetadata() {
        RestAssured.when().get("test-security-oidc-opaque-token").then()
                .body(is("userOidc:viewer:userOidc:viewer:user@gmail.com"));
    }

}
The ProtectedResource class, which is used in this code example, might look like this:
import jakarta.inject.Inject;
import jakarta.ws.rs.GET;
import jakarta.ws.rs.Path;

import io.quarkus.oidc.TokenIntrospection;
import io.quarkus.security.Authenticated;
import io.quarkus.security.identity.SecurityIdentity;

@Path("/service")
@Authenticated
public class ProtectedResource {

    @Inject
    SecurityIdentity securityIdentity;
    @Inject
    TokenIntrospection introspection;

    @GET
    @Path("test-security-oidc-opaque-token")
    public String testSecurityOidcOpaqueToken() {
        return securityIdentity.getPrincipal().getName() + ":" + securityIdentity.getRoles().iterator().next()
            + ":" + introspection.getString("username")
            + ":" + introspection.getString("scope")
            + ":" + introspection.getString("email");
    }
}
The @TestSecurity, user, and roles attributes are available as TokenIntrospection, username, and scope properties.
Use io.quarkus.test.security.oidc.TokenIntrospection to add the additional introspection response properties, such as an email, and so on.
|
This is particularly useful if multiple test methods must use the same set of security settings. |
Check errors in the logs
To see more details about token verification errors, enable io.quarkus.oidc.runtime.OidcProvider and TRACE level logging:
quarkus.log.category."io.quarkus.oidc.runtime.OidcProvider".level=TRACE
quarkus.log.category."io.quarkus.oidc.runtime.OidcProvider".min-level=TRACE
To see more details about OidcProvider client initialization errors, enable io.quarkus.oidc.runtime.OidcRecorder and TRACE level logging as follows:
quarkus.log.category."io.quarkus.oidc.runtime.OidcRecorder".level=TRACE
quarkus.log.category."io.quarkus.oidc.runtime.OidcRecorder".min-level=TRACE
External and internal access to OIDC providers
The externally-accessible token of the OIDC provider and other endpoints might have different HTTP(S) URLs compared to the URLs that are auto-discovered or configured relative to the quarkus.oidc.auth-server-url internal URL.
For example, suppose your SPA acquires a token from an external token endpoint address and sends it to Quarkus as a bearer token.
In that case, the endpoint might report an issuer verification failure.
In such cases, if you work with Keycloak, start it with the KEYCLOAK_FRONTEND_URL system property set to the externally accessible base URL.
If you work with other OIDC providers, refer to your provider’s documentation.
Using the client-id property
The quarkus.oidc.client-id property identifies the OIDC client that requested the current bearer token.
The OIDC client can be an SPA application running in a browser or a Quarkus web-app confidential client application propagating the access token to the Quarkus service application.
This property is required if the service application is expected to introspect the tokens remotely, which is always the case for the opaque tokens.
This property is optional for local JSON Web Token (JWT) verification only.
Setting the quarkus.oidc.client-id property is encouraged even if the endpoint does not require access to the remote introspection endpoint.
This is because when client-id is set, it can be used to verify the token audience.
It will also be included in logs when the token verification fails, enabling better traceability of tokens issued to specific clients and analysis over a longer period.
For example, if your OIDC provider sets a token audience, consider the following configuration pattern:
# Set client-id
quarkus.oidc.client-id=quarkus-app
# Token audience claim must contain 'quarkus-app'
quarkus.oidc.token.audience=${quarkus.oidc.client-id}
If you set quarkus.oidc.client-id, but your endpoint does not require remote access to one of the OIDC provider endpoints (introspection, token acquisition, and so on), do not set a client secret with quarkus.oidc.credentials or similar properties because it will not be used.
|
Quarkus |
Sender-constraining access tokens
Demonstrating Proof of Possession (DPoP)
RFC9449 describes a Demonstrating Proof of Possession (DPoP) mechanism for cryprographically binding an access token to the current client, preventing the access token loss and replay.
Single page application (SPA) public clients generate DPoP proof tokens and use them to acquire and submit access tokens which are cryptograhically bound to DPoP proofs.
Enabling DPoP support in Quarkus requires a single property.
For example:
quarkus.oidc.auth-server-url=${your_oidc_provider_url}
quarkus.oidc.token.authorization-scheme=dpop (1)| 1 | Require that the access tokens are provided using HTTP Authorization DPoP scheme value. |
After accepting such tokens, Quarkus will go through the full DPoP token verification process.
You can define a custom DPoP nonce provider by implementing the io.quarkus.oidc.DPoPNonceProvider interface as a CDI bean.
If the DPoP proof nonce is missing or invalid, Quarkus responds with the 401 Unauthorized status and attaches the expected nonce as the DPoP-Nonce header value.
Mutual TLS token binding
RFC8705 describes a mechanism for binding access tokens to Mutual TLS (mTLS) client authentication certificates.
It requires that a client certificate’s SHA256 thumbprint matches a JWT token or token introspection confirmation x5t#S256 certificate thumbprint.
For example, see JWT Certificate Thumbprint Confirmation Method and Confirmation Method for Token Introspection sections of RFC8705.
MTLS token binding supports a holder of key concept, and can be used to confirm that the current access token was issued to the current authenticated client who presents this token.
When you use both mTLS and OIDC bearer authentication mechanisms, you can enforce that the access tokens must be certificate bound with a single property, after configuring your Quarkus endpoint and Quarkus OIDC to require the use of mTLS.
For example:
quarkus.oidc.auth-server-url=${your_oidc_provider_url}
quarkus.oidc.token.binding.certificate=true (1)
quarkus.oidc.tls.tls-configuration-name=oidc-client-tls (2)

quarkus.tls.oidc-client-tls.key-store.p12.path=target/certificates/oidc-client-keystore.p12 (2)
quarkus.tls.oidc-client-tls.key-store.p12.password=password
quarkus.tls.oidc-client-tls.trust-store.p12.path=target/certificates/oidc-client-truststore.p12
quarkus.tls.oidc-client-tls.trust-store.p12.password=password

quarkus.http.tls-configuration-name=oidc-server-mtls (3)
quarkus.tls.oidc-server-mtls.key-store.p12.path=target/certificates/oidc-keystore.p12
quarkus.tls.oidc-server-mtls.key-store.p12.password=password
quarkus.tls.oidc-server-mtls.trust-store.p12.path=target/certificates/oidc-server-truststore.p12
quarkus.tls.oidc-server-mtls.trust-store.p12.password=password| 1 | Require that bearer access tokens must be bound to the client certificates. |
| 2 | TLS registry configuration for Quarkus OIDC be able to communicate with the OIDC provider over MTLS |
| 3 | TLS registry configuration requiring external clients to authenticate to the Quarkus endpoint over MTLS |
The above configuration is sufficient to require that OIDC bearer tokens are bound to the client certificates.
Next, if you need to access both mTLS and OIDC bearer security identities, consider enabling Inclusive authentication with quarkus.http.auth.inclusive=true.
Now you can access both MTLS and OIDC security identities as follows:
package io.quarkus.it.oidc;

import jakarta.inject.Inject;
import jakarta.ws.rs.GET;
import jakarta.ws.rs.Path;

import org.eclipse.microprofile.jwt.JsonWebToken;
import io.quarkus.security.Authenticated;
import io.quarkus.security.credential.CertificateCredential;
import io.quarkus.security.identity.SecurityIdentity;

@Path("/service")
@Authenticated
public class OidcMtlsEndpoint {

    @Inject
    SecurityIdentity mtlsIdentity; (1)

    @Inject
    JsonWebToken oidcAccessToken; (2)

    @GET
    public String getIdentities() {
        var cred = identity.getCredential(CertificateCredential.class).getCertificate();
        return "Identities: " + cred.getSubjectX500Principal().getName().split(",")[0]
                + ", " + accessToken.getName();
    }
}| 1 | SecurityIdentity always represents the primary mTLS authentication when mTLS is used and an inclusive authentication is enabled. |
| 2 | OIDC security identity is also available because enabling an inclusive authentication requires all registered mechanisms to produce the security identity. |
Authentication after an HTTP request has completed
Sometimes, SecurityIdentity for a given token must be created when there is no active HTTP request context.
The quarkus-oidc extension provides io.quarkus.oidc.TenantIdentityProvider to convert a token to a SecurityIdentity instance.
For example, one situation when you must verify the token after the HTTP request has completed is when you are processing messages with Vert.x event bus.
The example below uses the 'product-order' message within different CDI request contexts.
Therefore, an injected SecurityIdentity would not correctly represent the verified identity and be anonymous.
package org.acme.quickstart.oidc;

import static jakarta.ws.rs.core.HttpHeaders.AUTHORIZATION;

import jakarta.inject.Inject;
import jakarta.ws.rs.HeaderParam;
import jakarta.ws.rs.POST;
import jakarta.ws.rs.Path;
import io.vertx.core.eventbus.EventBus;

@Path("order")
public class OrderResource {

    @Inject
    EventBus eventBus;

    @POST
    public void order(String product, @HeaderParam(AUTHORIZATION) String bearer) {
        String rawToken = bearer.substring("Bearer ".length()); (1)
        eventBus.publish("product-order", new Product(product, rawToken));
    }

    public static class Product {
         public String product;
         public String customerAccessToken;
         public Product() {
         }
         public Product(String product, String customerAccessToken) {
             this.product = product;
             this.customerAccessToken = customerAccessToken;
         }
    }
}| 1 | At this point, the token is not verified when proactive authentication is disabled. |
package org.acme.quickstart.oidc;

import jakarta.enterprise.context.ApplicationScoped;
import jakarta.inject.Inject;

import io.quarkus.oidc.AccessTokenCredential;
import io.quarkus.oidc.Tenant;
import io.quarkus.oidc.TenantIdentityProvider;
import io.quarkus.security.identity.SecurityIdentity;
import io.quarkus.vertx.ConsumeEvent;
import io.smallrye.common.annotation.Blocking;

@ApplicationScoped
public class OrderService {

    @Tenant("tenantId")
    @Inject
    TenantIdentityProvider identityProvider;

    @Inject
    TenantIdentityProvider defaultIdentityProvider; (1)

    @Blocking
    @ConsumeEvent("product-order")
    void processOrder(OrderResource.Product product) {
        AccessTokenCredential tokenCredential = new AccessTokenCredential(product.customerAccessToken);
        SecurityIdentity securityIdentity = identityProvider.authenticate(tokenCredential).await().indefinitely(); (2)
        ...
    }

}| 1 | For the default tenant, the Tenant qualifier is optional. |
| 2 | Executes token verification and converts the token to a SecurityIdentity. |
|
When the provider is used during an HTTP request, the tenant configuration can be resolved as described in
the Using OpenID Connect Multi-Tenancy guide.
However, when there is no active HTTP request, you must select the tenant explicitly with the |
|
Dynamic tenant configuration resolution is currently not supported. Authentication that requires a dynamic tenant will fail. |
OIDC request filters
You can filter OIDC requests made by Quarkus to the OIDC provider by registering one or more OidcRequestFilter implementations, which can update or add new request headers, and log requests.
For more information, see OIDC request filters.
OIDC response filters
You can filter responses from the OIDC providers by registering one or more OidcResponseFilter implementations, which can check the response status, headers and body in order to log them or perform other actions.
You can have a single filter intercepting all the OIDC responses, or use an @OidcEndpoint annotation to apply this filter to the specific endpoint responses only. For example:
package io.quarkus.it.keycloak;

import jakarta.enterprise.context.ApplicationScoped;

import io.quarkus.arc.Unremovable;
import io.quarkus.logging.Log;
import io.quarkus.oidc.common.OidcEndpoint;
import io.quarkus.oidc.common.OidcEndpoint.Type;
import io.quarkus.oidc.common.OidcResponseFilter;
import io.smallrye.mutiny.Uni;
import io.quarkus.oidc.common.runtime.OidcConstants;
import io.quarkus.oidc.runtime.OidcUtils;

@ApplicationScoped
@Unremovable
@OidcEndpoint(value = Type.DISCOVERY) (1)
public class DiscoveryEndpointResponseFilter implements OidcResponseFilter {

    @Override
    public Uni<Void> filter(OidcResponseFilterContext rc) {
        String contentType = rc.responseHeaders().get("Content-Type"); (2)
        if (contentType.equals("application/json") {
            String tenantId = rc.requestProperties().get(OidcUtils.TENANT_ID_ATTRIBUTE); (3)
            String metadata = rc.responseBody().toString(); (4)
            Log.debugf("Tenant %s OIDC metadata: %s", tenantId, metadata);
        }
        return Uni.createFrom().voidItem();
    }
}| 1 | Restrict this filter to requests targeting the OIDC discovery endpoint only. |
| 2 | Check the response Content-Type header. |
| 3 | Use OidcRequestContextProperties request properties to get the tenant id. |
| 4 | Get the response data as String. |
Restricting OIDC request and response filters to bearer token flow
When you have both the bearer access token and authorization code flows supported by multiple OIDC tenants and the filters have to deal with a flow specific logic, you can instead have them restricted to the bearer token flow with the io.quarkus.oidc.BearerTokenAuthentication annotation and the authorization code flow with the 'io.quarkus.oidc.AuthorizationCodeFlow' annotation.
For example:
package io.quarkus.it.keycloak;

import io.quarkus.arc.Unremovable;
import io.quarkus.oidc.BearerTokenAuthentication;
import io.quarkus.oidc.common.OidcRequestFilter;
import io.smallrye.mutiny.Uni;
import jakarta.enterprise.context.ApplicationScoped;

@BearerTokenAuthentication
@ApplicationScoped
@Unremovable
public class CustomOidcRequestFilter implements OidcRequestFilter {

    @Override
    public Uni<Void> filter(OidcRequestFilterContext requestContext) {
        requestContext.request().putHeader("custom-header-name", "custom-header-value");
        return Uni.createFrom().voidItem();
    }
}
Programmatic OIDC start-up
OIDC tenants can be created programmatically like in the example below:
package io.quarkus.it.oidc;

import io.quarkus.oidc.Oidc;
import jakarta.enterprise.event.Observes;

public class OidcStartup {

    void observe(@Observes Oidc oidc) {
        oidc.createServiceApp("http://localhost:8180/realms/quarkus");
    }

}
The code above is a programmatic equivalent to the following configuration in the application.properties file:
quarkus.oidc.auth-server-url=http://localhost:8180/realms/quarkusShould you need to configure more OIDC tenant properties, use the OidcTenantConfig builder like in the example below:
package io.quarkus.it.oidc;

import io.quarkus.oidc.Oidc;
import io.quarkus.oidc.OidcTenantConfig;
import jakarta.enterprise.event.Observes;

public class OidcStartup {

    void createDefaultTenant(@Observes Oidc oidc) {
        var defaultTenant = OidcTenantConfig
                .authServerUrl("http://localhost:8180/realms/quarkus")
                .token().requireJwtIntrospectionOnly().end()
                .build();
        oidc.create(defaultTenant);
    }
}
For more complex setup involving multiple tenants please see the Programmatic OIDC start-up for multitenant application section of the OpenID Connect Multi-Tenancy guide.
Step Up Authentication
The io.quarkus.oidc.AuthenticationContext annotation can be used to list one or more Authentication Context Class Reference (ACR) values to enforce a required authentication level for the Jakarta REST resource classes and methods.
The OAuth 2.0 Step Up Authentication Challenge Protocol introduces a mechanism for resource servers to request stronger authentication methods when the token does not have expected Authentication Context Class Reference (ACR) values.
Consider the following example:
package io.quarkus.it.oidc;

import io.quarkus.oidc.AuthenticationContext;
import io.quarkus.oidc.BearerTokenAuthentication;
import jakarta.ws.rs.GET;
import jakarta.ws.rs.Path;

@BearerTokenAuthentication
@Path("/")
public class GreetingsResource {

    @Path("hello")
    @AuthenticationContext("myACR") (1)
    @GET
    public String hello() {
        return "hello";
    }

    @Path("hi")
    @AuthenticationContext(value = "myACR", maxAge = "PT120m") (2)
    @GET
    public String hi() {
        return "hi";
    }
}| 1 | Bearer access token must have an acr claim with the myACR ACR value. |
| 2 | Bearer access token must have an acr claim with the myACR ACR value and be in use for no longer than 120 minutes since the authentication time. |
quarkus.http.auth.proactive=false (1)| 1 | Disable proactive authentication so that the @AuthenticationContext annotation can be matched with the endpoint before Quarkus authenticates incoming requests. |
If the bearer access token claim acr does not contain myACR, Quarkus returns an authentication requirements challenge indicating required acr_values:
HTTP/1.1 401 Unauthorized
WWW-Authenticate: Bearer error="insufficient_user_authentication",
 error_description="A different authentication level is required",
 acr_values="myACR"
When a client such as Single-page application (SPA) receives a challenge with the insufficient_user_authentication error code, it must parse acr_values, request a new user login which must meet the acr_values constraints, and use a new access token to access Quarkus.
|
The |
It is also possible to enforce the required authentication level for an OIDC tenant:
quarkus.oidc.hr.token.required-claims.acr=myACROr, if you need more flexibility, write a Jose4j Validator:
package io.quarkus.it.oidc;

import java.util.Collections;
import java.util.List;
import java.util.Map;

import jakarta.enterprise.context.ApplicationScoped;

import org.eclipse.microprofile.jwt.Claims;
import org.jose4j.jwt.MalformedClaimException;
import org.jose4j.jwt.consumer.JwtContext;
import org.jose4j.jwt.consumer.Validator;

import io.quarkus.arc.Unremovable;
import io.quarkus.oidc.TenantFeature;
import io.quarkus.oidc.common.runtime.OidcConstants;
import io.quarkus.security.AuthenticationFailedException;

@Unremovable
@ApplicationScoped
@TenantFeature("hr")
public class AcrValueValidator implements Validator {

    @Override
    public String validate(JwtContext jwtContext) throws MalformedClaimException {
        var jwtClaims = jwtContext.getJwtClaims();
        var acrClaimName = Claims.acr.name();

        if (jwtClaims.hasClaim(acrClaimName)) {
            // The claim 'acr' could be a String or a list
            List<String> acrClaimValues;
            if (jwtClaims.isClaimValueStringList(acrClaimName)) {
               acrClaimValues = jwtClaims.getStringListClaimValue(acrClaimName);
            } else if (jwtClaims.isClaimValueString(acrClaimName)) {
               acrClaimValues = List.of(jwtClaims.getStringClaimValue(acrClaimName));
            } else {
                throw new MalformedClaimException("Claim '" + acrClaimName + "' is not a String or List of Strings.");
            }
            if (acrClaimValues.contains("myACR") && acrClaimValues.contains("yourACR")) {
                return null;
            }
        }
        String requiredAcrValues = "myACR,yourACR";
        throw new AuthenticationFailedException(Map.of(OidcConstants.ACR_VALUES, requiredAcrValues));
    }
}