Introducción a la mensajería Quarkus con AMQP 1.0
Esta guía demuestra cómo su aplicación Quarkus puede utilizar Quarkus Messaging para interactuar con AMQP 1.0.
| Si desea utilizar RabbitMQ, deberá utilizar la extensión RabbitMQ de Quarkus Messaging. Alternativamente, si desea utilizar RabbitMQ con AMQP 1.0 deberá habilitar el plugin AMQP 1.0 en el broker RabbitMQ; consulte la documentación de conexión a RabbitMQ. |
Requisitos previos
To complete this guide, you need:
-
Roughly 15 minutes
-
An IDE
-
JDK 17+ installed with
JAVA_HOMEconfigured appropriately -
Apache Maven 3.9.16
-
Docker and Docker Compose or Podman, and Docker Compose
-
Optionally the Quarkus CLI if you want to use it
-
Optionally Mandrel or GraalVM installed and configured appropriately if you want to build a native executable (or Docker if you use a native container build)
Arquitectura
En esta guía, vamos a desarrollar dos aplicaciones que se comunican con un broker AMQP. Utilizaremos Artemis, pero puede utilizar cualquier broker AMQP 1.0. La primera aplicación envía una quote request a una cola AMQP y consume mensajes de la cola de quote. La segunda aplicación recibe la quote request y envía una quote de vuelta.
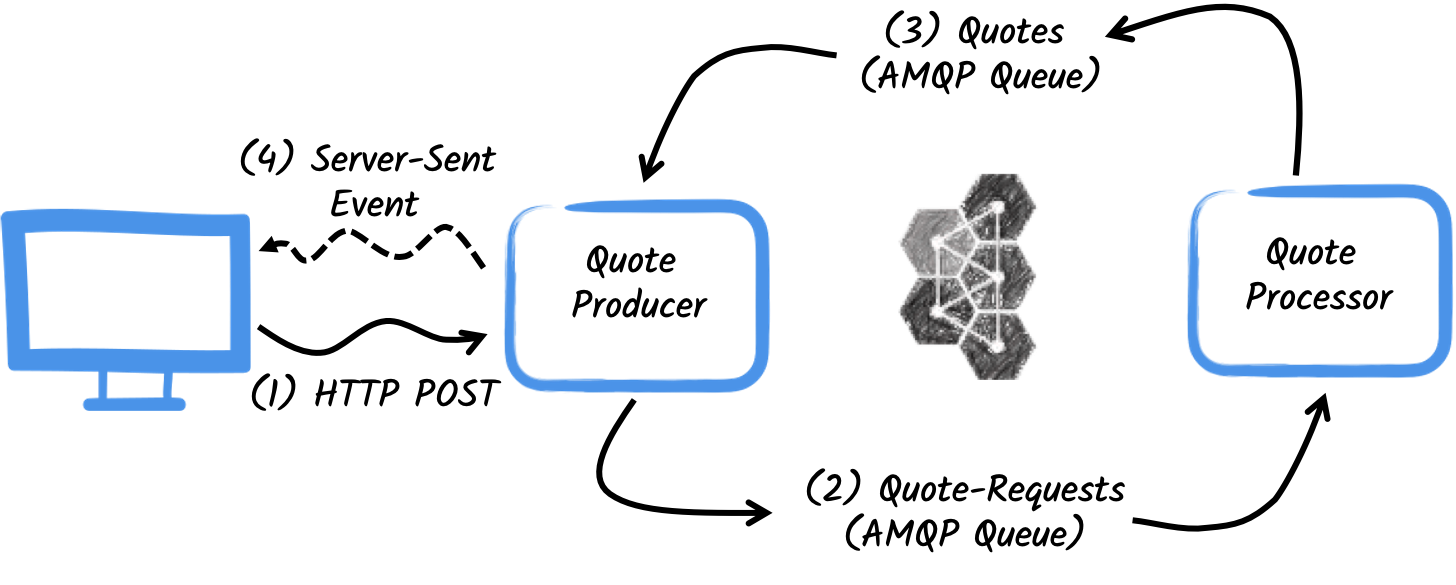
The first application, the producer, will let the user request some quotes over an HTTP endpoint.
For each quote request, a random identifier is generated and returned to the user, to put the quote request on pending.
At the same time, the generated request id is sent over the quote-requests queue.
The second application, the processor, in turn, will read from the quote-requests queue, put a random price to the quote, and send it to a queue named quotes.
Por último, el producer leerá las cotizaciones y las enviará al navegador mediante eventos enviados por el servidor. Por tanto, el usuario verá el precio de la cotización actualizado de pendiente al precio recibido en tiempo real.
Solución
Le recomendamos que siga las instrucciones de las siguientes secciones y cree las aplicaciones paso a paso. No obstante, puede ir directamente al ejemplo completado.
Clone el repositorio Git: git clone https://github.com/quarkusio/quarkus-quickstarts.git o descargue un archivo.
La solución se encuentra en amqp-quickstart directorio.
Creación del proyecto Maven
En primer lugar, tenemos que crear dos proyectos: el productor y el procesador.
Para crear el proyecto productor, en un terminal ejecute:
For Windows users:
-
If using cmd, (don’t use backward slash
\and put everything on the same line) -
If using Powershell, wrap
-Dparameters in double quotes e.g."-DprojectArtifactId=amqp-quickstart-producer"
This command creates the project structure and selects the two Quarkus extensions we will be using:
-
Quarkus REST (antes RESTEasy Reactive) y su soporte Jackson para manejar cargas útiles JSON
-
El conector AMQP de mensajería reactiva
Para crear el proyecto del procesador, desde el mismo directorio, ejecute:
For Windows users:
-
If using cmd, (don’t use backward slash
\and put everything on the same line) -
If using Powershell, wrap
-Dparameters in double quotes e.g."-DprojectArtifactId=amqp-quickstart-processor"
At that point, you should have the following structure:
.
├── amqp-quickstart-processor
│  ├── README.md
│  ├── mvnw
│  ├── mvnw.cmd
│  ├── pom.xml
│  └── src
│     └── main
│        ├── docker
│        ├── java
│        └── resources
│           └── application.properties
└── amqp-quickstart-producer
   ├── README.md
   ├── mvnw
   ├── mvnw.cmd
   ├── pom.xml
   └── src
      └── main
         ├── docker
         ├── java
         └── resources
            └── application.properties
Abra los dos proyectos en su IDE favorito.
El objeto Cotización
The Quote class will be used in both producer and processor projects.
For the sake of simplicity, we will duplicate the class.
In both projects, create the src/main/java/org/acme/amqp/model/Quote.java file, with the following content:
package org.acme.amqp.model;

import io.quarkus.runtime.annotations.RegisterForReflection;

@RegisterForReflection
public class Quote {

    public String id;
    public int price;

    /**
    * Default constructor required for Jackson serializer
    */
    public Quote() { }

    public Quote(String id, int price) {
        this.id = id;
        this.price = price;
    }

    @Override
    public String toString() {
        return "Quote{" +
                "id='" + id + '\'' +
                ", price=" + price +
                '}';
    }
}
La representación JSON de los objetos Quote se utilizará en los mensajes enviados a las colas AMQP y también en los eventos enviados por el servidor a los clientes del navegador.
Quarkus tiene capacidades incorporadas para tratar con mensajes JSON AMQP.
|
@RegisterForReflection
La anotación |
Envío de solicitud de presupuesto
Inside the producer project, locate the generated src/main/java/org/acme/amqp/producer/QuotesResource.java file, and update the content to be:
package org.acme.amqp.producer;

import java.util.UUID;

import jakarta.ws.rs.GET;
import jakarta.ws.rs.POST;
import jakarta.ws.rs.Path;
import jakarta.ws.rs.Produces;
import jakarta.ws.rs.core.MediaType;

import org.acme.amqp.model.Quote;
import org.eclipse.microprofile.reactive.messaging.Channel;
import org.eclipse.microprofile.reactive.messaging.Emitter;

import io.smallrye.mutiny.Multi;

@Path("/quotes")
public class QuotesResource {

    @Channel("quote-requests") Emitter<String> quoteRequestEmitter; (1)

    /**
     * Endpoint to generate a new quote request id and send it to "quote-requests" AMQP queue using the emitter.
     */
    @POST
    @Path("/request")
    @Produces(MediaType.TEXT_PLAIN)
    public String createRequest() {
        UUID uuid = UUID.randomUUID();
        quoteRequestEmitter.send(uuid.toString()); (2)
        return uuid.toString();
    }
}| 1 | Inyectar una Mensajería Reactiva Emitter para enviar mensajes al canal quote-requests. |
| 2 | En una solicitud de publicación, genera un UUID aleatorio y lo envía a la cola AMQP utilizando el emisor. |
El canal quote-requests se va a gestionar como una cola AMQP, ya que es el único conector en el classpath. Si no se indica lo contrario, como en este ejemplo, Quarkus utiliza el nombre del canal como nombre de la cola AMQP. Así, en este ejemplo, la aplicación envía mensajes a la cola quote-requests.
| Si tiene varios conectores, deberá indicar qué conector desea utilizar en la configuración de la aplicación. |
Tramitación de solicitudes de quota
Ahora vamos a consumir la solicitud de presupuesto y a dar un precio. Dentro del proyecto processor, localice el archivo src/main/java/org/acme/amqp/processor/QuoteProcessor.java y añada lo siguiente:
package org.acme.amqp.processor;

import java.util.Random;

import jakarta.enterprise.context.ApplicationScoped;

import org.acme.amqp.model.Quote;
import org.eclipse.microprofile.reactive.messaging.Incoming;
import org.eclipse.microprofile.reactive.messaging.Outgoing;

import io.smallrye.reactive.messaging.annotations.Blocking;

/**
 * A bean consuming data from the "request" AMQP queue and giving out a random quote.
 * The result is pushed to the "quotes" AMQP queue.
 */
@ApplicationScoped
public class QuoteProcessor {

    private Random random = new Random();

    @Incoming("requests")       (1)
    @Outgoing("quotes")         (2)
    @Blocking                   (3)
    public Quote process(String quoteRequest) throws InterruptedException {
        // simulate some hard-working task
        Thread.sleep(200);
        return new Quote(quoteRequest, random.nextInt(100));
    }
}| 1 | Indica que el método consume los elementos del canal requests |
| 2 | Indica que los objetos devueltos por el método se envían al canal quotes |
| 3 | Indica que el procesamiento está bloqueando y no puede ser ejecutado en el hilo de la llamada. |
El método process es llamado por cada mensaje AMQP de la cola quote-requests, y enviará un objeto Quote a la cola quotes.
Como queremos consumir mensajes de la cola quotes-requests en el canal requests, tenemos que configurar esta asociación. Abra el archivo src/main/resources/application.properties y añada:
mp.messaging.incoming.requests.address=quote-requestsLas propiedades de configuración están estructuradas de la siguiente manera:
mp.messaging.[outgoing|incoming].{channel-name}.property=value
En nuestro caso, queremos configurar el atributo address para indicar el nombre de la cola.
Recepción de presupuestos
Volvamos a nuestro proyecto producer. Modifiquemos el QuotesResource para consumir cotizaciones, vinculémoslo a un endpoint HTTP para enviar eventos a los clientes:
import io.smallrye.mutiny.Multi;
//...

@Channel("quotes") Multi<Quote> quotes;     (1)

/**
 * Endpoint retrieving the "quotes" queue and sending the items to a server sent event.
 */
@GET
@Produces(MediaType.SERVER_SENT_EVENTS) (2)
public Multi<Quote> stream() {
    return quotes; (3)
}| 1 | Inyecta el canal quotes utilizando el calificador @Channel |
| 2 | Indica que el contenido se envía utilizando Server Sent Events |
| 3 | Devuelve el flujo (Reactive Stream) |
La página HTML
El toque final, la página HTML que lee los precios convertidos usando SSE.
Cree dentro del proyecto producer el archivo src/main/resources/META-INF/resources/quotes.html, con el siguiente contenido:
<!DOCTYPE html> <html lang="en"> <head> <meta charset="UTF-8"> <title>Quotes</title>

    <link rel="stylesheet" type="text/css"
          href="https://cdnjs.cloudflare.com/ajax/libs/patternfly/3.24.0/css/patternfly.min.css">
    <link rel="stylesheet" type="text/css"
          href="https://cdnjs.cloudflare.com/ajax/libs/patternfly/3.24.0/css/patternfly-additions.min.css">
</head>
<body>
<div class="container">
    <div class="card">
        <div class="card-body">
            <h2 class="card-title">Quotes</h2>
            <button class="btn btn-info" id="request-quote">Request Quote</button>
            <div class="quotes"></div>
        </div>
    </div>
</div>
</body>
<script src="https://code.jquery.com/jquery-3.6.0.min.js"></script>
<script>
    $("#request-quote").click((event) => {
        fetch("/quotes/request", {method: "POST"})
        .then(res => res.text())
        .then(qid => {
            var row = $(`<h4 class='col-md-12' id='${qid}'>Quote # <i>${qid}</i> | <strong>Pending</strong></h4>`);
            $(".quotes").append(row);
        });
    });
    var source = new EventSource("/quotes");
    source.onmessage = (event) => {
      var json = JSON.parse(event.data);
      $(`#${json.id}`).html(function(index, html) {
        return html.replace("Pending", `\$\xA0${json.price}`);
      });
    };
</script>
</html>
Aquí no hay nada espectacular. En cada cita recibida, actualiza la página.
Ponerlo en marcha
Sólo tienes que ejecutar ambas aplicaciones utilizando:
> mvn -f amqp-quickstart-producer quarkus:devY, en una terminal separada:
> mvn -f amqp-quickstart-processor quarkus:devQuarkus starts an AMQP broker automatically, configures the application, and shares the broker instance between different applications. See Dev Services for AMQP for more details.
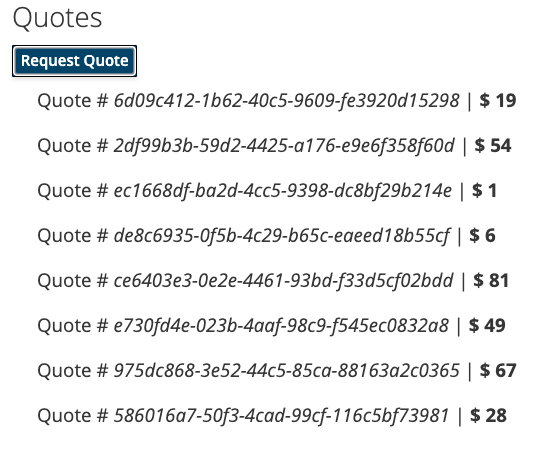
Abra http://localhost:8080/quotes.html en su navegador y solicite algunos presupuestos haciendo clic en el botón.
Ejecución en modo JVM o nativo
Cuando no esté ejecutando en modo desarrollo o test, necesitará iniciar su broker AMQP. Puede seguir las instrucciones del sitio web de Apache ActiveMQ Artemis o crear un archivo docker-compose.yaml con el siguiente contenido:
version: '2'

services:

  artemis:
    image: quay.io/artemiscloud/activemq-artemis-broker:1.0.25
    ports:
      - "8161:8161"
      - "61616:61616"
      - "5672:5672"
    environment:
      AMQ_USER: quarkus
      AMQ_PASSWORD: quarkus
    networks:
      - amqp-quickstart-network

  producer:
    image: quarkus-quickstarts/amqp-quickstart-producer:1.0-${QUARKUS_MODE:-jvm}
    build:
      context: amqp-quickstart-producer
      dockerfile: src/main/docker/Dockerfile.${QUARKUS_MODE:-jvm}
    environment:
      AMQP_HOST: artemis
      AMQP_PORT: 5672
    ports:
      - "8080:8080"
    networks:
      - amqp-quickstart-network

  processor:
    image: quarkus-quickstarts/amqp-quickstart-processor:1.0-${QUARKUS_MODE:-jvm}
    build:
      context: amqp-quickstart-processor
      dockerfile: src/main/docker/Dockerfile.${QUARKUS_MODE:-jvm}
    environment:
      AMQP_HOST: artemis
      AMQP_PORT: 5672
    networks:
      - amqp-quickstart-network

networks:
  amqp-quickstart-network:
    name: amqp-quickstart
Observe cómo se configura la ubicación del agente AMQP. Las propiedades amqp.host y amqp.port ( AMQP_HOST y AMQP_PORT variables de entorno) configuran la ubicación.
En primer lugar, asegúrese de que ha detenido las aplicaciones, y construya ambas aplicaciones en modo JVM con:
> mvn -f amqp-quickstart-producer clean package
> mvn -f amqp-quickstart-processor clean package
Una vez empaquetado, ejecute docker compose up --build . La interfaz de usuario se expone en http://localhost:8080/quotes.html .
Para ejecutar tus aplicaciones como nativas, primero tenemos que construir los ejecutables nativos:
> mvn -f amqp-quickstart-producer package -Dnative  -Dquarkus.native.container-build=true
> mvn -f amqp-quickstart-processor package -Dnative -Dquarkus.native.container-build=true
El -Dquarkus.native.container-build=true instruye a Quarkus para construir ejecutables nativos de Linux 64bits, que pueden ejecutarse dentro de contenedores. A continuación, ejecute el sistema utilizando:
> export QUARKUS_MODE=native
> docker compose up --build
Como antes, la interfaz de usuario está expuesta en http://localhost:8080/quotes.html
Ir más allá
Esta guía ha mostrado cómo se puede interactuar con AMQP 1.0 utilizando Quarkus. Utiliza SmallRye Reactive Messaging para construir aplicaciones de flujo de datos.
Si ha realizado el quickstart de Kafka, se habrá dado cuenta de que se trata del mismo código. La única diferencia es la configuración del conector y el mapeo JSON.